13 Aug 2015
I have been battling with some rougue piece of code which I just discovered to be a known bug in the Android Design Support Library v22.2.1.
The TabLayout in a Fragment seems to loose its Tabs when you add/replace the fragment, and shows up when only when the fragment is recreated.
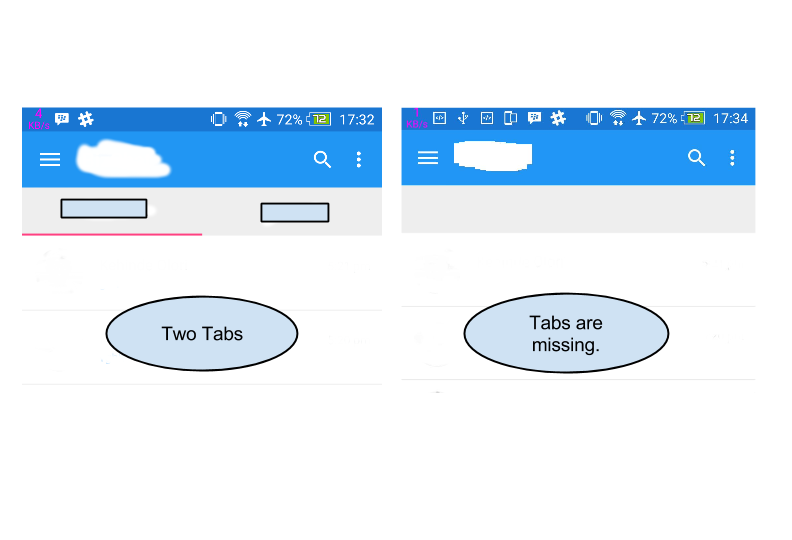
It is a known issue, and a permanent workaround is expected in a future release of the library. So Chris Banes recommends a workaround, by replacing your standard setupWithViewPager method,
@Override
public void onViewCreated(View view, Bundle savedInstanceState) {
    super.onViewCreated(view, savedInstanceState);
    tabLayout.setupWithViewPager(viewPager);
}
with,
@Override
public void onViewCreated(View view, Bundle savedInstanceState) {
    super.onViewCreated(view, savedInstanceState);

    ....

    if (ViewCompat.isLaidOut(tabLayout)) {
        tabLayout.setupWithViewPager(viewPager);
    } else {
        tabLayout.addOnLayoutChangeListener(new View.OnLayoutChangeListener() {

            @Override
            public void onLayoutChange(View v, int left, int top, int right,
              int bottom, int oldLeft, int oldTop, int oldRight, int oldBottom) {
                tabLayout.setupWithViewPager(viewPager);

                tabLayout.removeOnLayoutChangeListener(this);
            }
        });
    }
}
I hope this saves you some debugging time.
16 Jul 2015
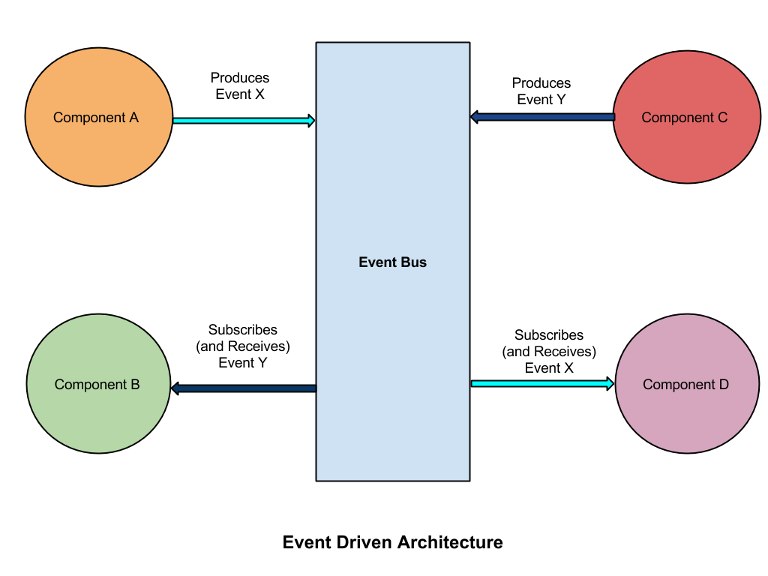
Communication between various components in the Android framework has been one of the major issues facing Android application development. A lot of work-arounds (more like hacks) have been used to solve some of this issues, many of which increases code complexity as the project expands and also leads to grossly inefficient use of the framework.
The event-driven architecture utilizes the Publisher-Subscriber pattern to solving issues with inter-component communication by allowing components asynchronously send, receive and process events. The publishers emits (produces) events, while the consumers subscribes for events. At the center of this architecture is the event-bus which receives events and sends them asynchronously to subscribers of these events.
###About Otto
There are a couple of libraries that help with implementing the event bus on Android, some of which includes EventBus, Otto. I have used Otto in some projects i have worked on and I will be explaining the fundamentals. Otto is an event bus designed to decouple different parts of your application while still allowing them to communicate efficiently. It is quite simple to use and highly optimized for Android.
####Create the Bus
You simply create a Bus object, which is the event bus implementation.
Bus bus = new Bus();
Most use-cases will require the creation of a singleton instance of Otto Bus. This can be defined in the Application sub-class
public class MainApplication extends Application {
   private static Bus bus;

   public static Bus getBusInstance(){
       if (bus == null){
           bus = new Bus();
       }
       return bus;
   }
}
####Publishing Events
Publishing an event is by calling the .post(event) method of the Bus class.
bus.post("Hello"); // posting a simple string

//sample class
public class Weather{
    int temperature
}

// posting an event
Weather event = new Weather();
event.temperature = 30;
bus.post(event);
####Registering and Unregistering for Events
Subscribing your consuming component to the event bus is achieved by registering the component class on the Bus, bus.register(this); and annotating a method with @Subscribe which will receive a single parameter with the type representing the event you wish to subscribe to. For example, subscribing an activity class;
public class MainActivity extends AppCompatActivity {

    @Override
    protected void onCreate(Bundle savedInstanceState) {
        super.onCreate(savedInstanceState);
        .....
    }

    @Override
    protected void onResume() {
        super.onResume();

        // Register the Subscribing class on the Bus
        MainApplication.getBusInstance().register(this);
    }

    @Override
    protected void onPause() {
        super.onPause();

        //unregister when a class should no longer be on the bus
        MainApplication.getBusInstance().unregister(this);
    }

    @Subscribe
    public void weatherAvailable(WeatherModel weatherModel) {
        // React to the event somehow!

    }
}
The event-driven paradigm allows for high decoupling between various application components. Example includes Activity-Fragment, Service-Activity communication. The example code implements a simple Service-Activity communication.
The full source code of the example is available on Github. If you have got questions, contributions, corrections, please leave a comment below.
09 Apr 2015

In the social media ero we live in, people are extremely conscious of how they are perceived by others. We are seeing a much higher level of expression especially from young people and pictures have become one of the most ubiquitous means of these expressions. Testament to these is the success of various photo-editing applications, Instagram, PicMix and others. The recently concluded Google Cloud Developer Challenge inspired us to create something that we think will help people express themselves more.
###Why we built Imageing?
While Instagram seem to have grabbed most of the market with their successful Android and iOS apps, they have yet to put the power of their awesome filters into their web app. The instagram web app only allows you to view photos, edit your profile and comment on photos. Considering the large amount of time people spend on their browsers, we thought their we could take advantage of that space and build a useful photo-editing application that would work on a browser and feature custom image filters and incorporate sharing.
###How it works
We built Imageing with the aim of helping browser-based users aggregate their photos from various social media channels (Facebook, Google+) and also photos on their devices, edit them with various Instagram-like filters and also let them share these edited photos on social media. We also had to ride on our users love for memes, by adding capabilities to create memes out of their photos.
We included trending photos on the homepage where we feature photos that are attracting high volume of traffic. (You could try it out at http://image.ng).
###How we did it?
Imageing’s backend is powered by Google’s AppEngine. When you just want to hack and in no mood to bother yourself about infrastructure and scalability challenges, you certainly would want a platform that offers top grade hardware capabilities and offers you features that allows you get a Minimum-Viable-Product within a short timespan. We had no doubt about AppEngine’s reliability. We chose the AppEngine’s Python runtime because, we wanted a simple language that would allow us iterate fast.
A challenge we had to face was the choice of image processing technique. We had to choose between doing the image processing on the server with Python Image-manipulation Library or on the browser with Javascript. We tried both and compared their performance and decided to go with client-side Image processing.
###Okay, about the team
Its a small team and most of us like to stay under the radar. Just for the records, we have +Caleb Mbakwe, +Moyinoluwa Adeyemi, +Akinade Gbenga and your’s truly +Oyewale Oyediran working on Imageing. We started building it in the laboratory at the Department of Computer Science at Obafemi Awolowo University during one of our free weekends. I’m always happy to answer questions about Imageing on my twitter handle @waleoyediran, if you tweet at me.
###Where are we going from here?
We are not calling for an IPO anytime soon (*giggles**). We are building new free and premium features into Imageing and improving the user experience. Yes, we are adding premium features, they are central to our monetization strategy. We would be ditching the appspot domain we are currently riding on for what we think is a more exciting domain name. We also have a native app cooking up, we would try to take on the big guys.
02 Apr 2015
In this post, i will be describing a pattern of designing a good SQLite data-access layer for Android.
When your application needs to offer complex data to other applications, the appriopriate approach is to use Content Providers. But many simple applications do not need to copy data to other applications. After using various approaches to data-access design over the years, I have been highly influenced by the approach used by the Ushahidi Android client.
Consider you want to store rows of Users in SQLite with the POJO described below:
public class User {
   public int id
   public String username;
   public String email;
   public Date createdDate;
}
We create an interface class that basically contains the Database schema definition. It contains table name, column names and table creation schema.
public interface IUserSchema {
   String USER_TABLE = "users";
   String COLUMN_ID = "_id";
   String COLUMN_USER_NAME = "user_name";
   String COLUMN_EMAIL = "email";
   String COLUMN_DATE = "created_date";
   String USER_TABLE_CREATE = "CREATE TABLE IF NOT EXISTS "
       + USER_TABLE
       + " ("
       + COLUMN_ID
       + " INTEGER PRIMARY KEY, "
       + COLUMN_USER_NAME
       + " TEXT NOT NULL, "
       + COLUMN_EMAIL
       + " TEXT,"
       + COLUMN_DATE
       + "BIGINT "
   + ")";

   String[] USER_COLUMNS = new String[] { COLUMN_ID,
      COLUMN_USER_NAME, COLUMN_EMAIL, COLUMN_DATE };
}
The CRUD functionality is abstracted in a DbContentProvider class which is inherited by the UserDao class
public abstract class DbContentProvider {
    public SQLiteDatabase mDb;

    public int delete(String tableName, String selection,
      String[] selectionArgs) {
        return mDb.delete(tableName, selection, selectionArgs);
    }

    public long insert(String tableName, ContentValues values) {
        return mDb.insert(tableName, null, values);
    }

    protected abstract <T> T cursorToEntity(Cursor cursor);

    public DbContentProvider(SQLiteDatabase db) {
       this.mDb = db;
    }

    public Cursor query(String tableName, String[] columns,
      String selection, String[] selectionArgs, String sortOrder) {

       final Cursor cursor = mDb.query(tableName, columns,
        selection, selectionArgs, null, null, sortOrder);

       return cursor;
    }

    public Cursor query(String tableName, String[] columns,
      String selection, String[] selectionArgs, String sortOrder,
      String limit) {

       return mDb.query(tableName, columns, selection,
        selectionArgs, null, null, sortOrder, limit);
    }

    public Cursor query(String tableName, String[] columns,
        String selection, String[] selectionArgs, String groupBy,
        String having, String orderBy, String limit) {

        return mDb.query(tableName, columns, selection,
            selectionArgs, groupBy, having, orderBy, limit);
    }

    public int update(String tableName, ContentValues values,
        String selection, String[] selectionArgs) {
        return mDb.update(tableName, values, selection,
          selectionArgs);
    }

    public Cursor rawQuery(String sql, String[] selectionArgs) {
        return mDb.rawQuery(sql, selectionArgs);
    }
}
The basic functions of the User data-access layer could optionally be described in an Interface such as this.
public interface IUserDao {
   public User fetchUserById(int userId);
   public List<User> fetchAllUsers();
   // add user
   public boolean addUser(User user);
   // add users in bulk
   public boolean addUsers(List<User> users);
   public boolean deleteAllUsers();
}
Now we create our User Data Access class.
public class UserDao extends DbContentProvider
   implements IUserSchema, IUserDao {

   private Cursor cursor;
   private ContentValues initialValues;
   public UserDao(SQLiteDatabase db) {
      super(db);
   }
   public User fetchUserByID(int id) {
   final String selectionArgs[] = { String.valueOf(id) };
   final String selection = ID + " = ?";
   User user = new User();
   cursor = super.query(USER_TABLE, USER_COLUMNS, selection,
           selectionArgs, COLUMN_ID);
   if (cursor != null) {
       cursor.moveToFirst();
       while (!cursor.isAfterLast()) {
           user = cursorToEntity(cursor);
           cursor.moveToNext();
       }
       cursor.close();
   }

   return user;
   }

   public List<User> fetchAllUsers() {
       List<User> userList = new ArrayList<User>();
       cursor = super.query(USER_TABLE, USER_COLUMNS, null,
               null, COLUMN_ID);

       if (cursor != null) {
           cursor.moveToFirst();
           while (!cursor.isAfterLast()) {
               User user = cursorToEntity(cursor);
               userList.add(user);
               cursor.moveToNext();
           }
           cursor.close();
       }

       return userList;
    }

    public boolean addUser(User user) {
       // set values
       setContentValue(user);
       try {
           return super.insert(USER_TABLE, getContentValue()) > 0;
       } catch (SQLiteConstraintException ex){
           Log.w("Database", ex.getMessage());
           return false;
       }
    }

    protected User cursorToEntity(Cursor cursor) {

       User user = new User();

       int idIndex;
       int userNameIndex;
       int emailIndex;
       int dateIndex;

       if (cursor != null) {
           if (cursor.getColumnIndex(COLUMN_ID) != -1) {
               idIndex = cursor.getColumnIndexOrThrow(COLUMN_ID);
               user.id = cursor.getInt(idIndex);
           }
           if (cursor.getColumnIndex(COLUMN_USER_NAME) != -1) {
               userNameIndex = cursor.getColumnIndexOrThrow(
                COLUMN_USER_NAME);
               user.username = cursor.getString(userNameIndex);
           }
           if (cursor.getColumnIndex(COLUMN_EMAIL) != -1) {
               emailIndex = cursor.getColumnIndexOrThrow(
                COLUMN_EMAIL);
               user.email = cursor.getString(emailIndex);
           }
           if (cursor.getColumnIndex(COLUMN_DATE) != -1) {
               dateIndex = cursor.getColumnIndexOrThrow(COLUMN_DATE);
               user.createdDate = new Date(cursor.getLong(dateIndex));
           }

       }
       return user;
    }

    private void setContentValue(User user) {
       initialValues = new ContentValues();
       initialValues.put(COLUMN_ID, user.id);
       initialValues.put(COLUMN_USER_NAME, user.username);
       initialValues.put(COLUMN_EMAIL, user.email);
       initialValues.put(COLUMN_DATE, user.createdDate.getTime());
    }

    private ContentValues getContentValue() {
       return initialValues;
    }

}
Having our Data Access Object class setup, we then proceed to create our Database Helper class that provides an handle to the database resource. Its important to increment the DatabaseVersion on every schema change.
public class Database {
   private static final String TAG = "MyDatabase";
   private static final String DATABASE_NAME = "my_database.db";
   private DatabaseHelper mDbHelper;
   // Increment DB Version on any schema change
   private static final int DATABASE_VERSION = 1;
   private final Context mContext
   public static UserDao mUserDao;


   public Database open() throws SQLException {
       mDbHelper = new DatabaseHelper(mContext);
       SQLiteDatabase mDb = mDbHelper.getWritableDatabase();

       mUserDao = new UserDao(mDb);

       return this;
   }

   public void close() {
       mDbHelper.close();
   }

   public Database(Context context) {
       this.mContext = context;
   }


   private static class DatabaseHelper extends SQLiteOpenHelper {
       DatabaseHelper(Context context) {
           super(context, DATABASE_NAME, null, DATABASE_VERSION);
       }

       @Override
       public void onCreate(SQLiteDatabase db) {
           db.execSQL(IUserSchema.USER_TABLE_CREATE);
       }

       @Override
       public void onUpgrade(SQLiteDatabase db, int oldVersion,
          int newVersion) {
           Log.w(TAG, "Upgrading database from version "
                + oldVersion + " to "
                + newVersion + " which destroys all old data");

           db.execSQL("DROP TABLE IF EXISTS "
                + IUserSchema.USER_TABLE);
           onCreate(db);

       }
   }

}
The Database helper class creates an instance of the DAO class on opening the DB resource
The pattern aslo encourages having one static handle on the database which could be created in a Application subclass. The DB is opened onCreate of the application and closed onTerminate to avoid leaks.
public class MainApplication extends Application {
   public static final String TAG = MainApplication.class.getSimpleName();
   public static Database mDb;


   @Override
   public void onCreate() {
       super.onCreate();
       mDb = new Database(this);
       mDb.open();
   }

   @Override
   public void onTerminate() {
       mDb.close();
       super.onTerminate();
   }

}
Now in any part of your application, you can grab a user by his id like this:
UserEntity user = Database.mUserDao.fetchUserByID(userId);
and insert a user into the Database
boolean isSaved = Database.mUserDao.addUser(user)
###Credit
Much of the code here is adapted from the Ushahidi Android Client
10 Jun 2014
So I guess you are building an application that requires email to be sent out. Depending on your platform (PHP has the builtin mail() function and perhaps AppEngine’s Sendmail function), you might find yourself needing to use the Unix sendmail function.
To Install SendMail on Ubuntu, just run the command
# sudo apt-get install sendmail
To modify the default configuration:
Now your PHP mail() function and other services that depend on Sendmail should be firing now
Additionally, you might want to tail the log file to monitor sendmail functions.
# tail -f /var/log/maillog
So I hope you have a smoother devlopment experience with mails from your local machine.

** ..with love from Oyewale. **